blog > Making of my osu! storyboard demo (18 Sep 2018)
Making of my osu! storyboard demo

Links #
Index #
Prologue #
First things first, if you don't know what osu! is, it's a rythm game where you have to click circles which are (hopefully) synced with the music playing. There are multiple game modes, but the circle clicking one (also called 'osu!standard') is the most popular one [citation needed].
Beatmaps (which basically contain the music & metadata and describe when and where circles, sliders, spinners, etc should be) can also include a video and/or a storyboard. A storyboard, in its bare essence, describes a series of images and each image can have a timed series of transformations that will be applied to it (positioning/rotating/scaling/coloring/fading).
If you're still completely in the dark, here's a nice video that shows what gameplay with a storyboard in the background looks like (epilepsy warning): YouTube: How beautiful can osu! REALLY be? - Episode 2 [Sweet Dreams] . Everything that happens in the background is done using the storyboard. Amazing, right? Note that this is auto mode, it's not a human playing.
Backstory and timeline #
robin_be: is anyone familiar with storyboarding?
Emily | Sunpy: I am somewhat familiar with it. But I havent done any storyboarding in along time. But im guessing you are thinking about opsu port?
robin_be: nah I'm planning something that's gonna fail miserably
robin_be: what is an .osb file?
yeah... silly me in #offtopic in Knorke discord, July 12th 2017
July 2017 #
I can't exactly remember why I wanted to try out storyboarding. I think it's because I wanted to try something different. If you recognize my username, you might be familiar with my osu! cursordance videos. I made a few of those, after being amazed by the work by MrRheinerZufall. (This was back in mid-2016) (I even forked opsu! into opsu!dance to add cursordance-y stuff to it). I tried to add something new or original into every video. If I didn't do that, every video felt basically the same to me, and I don't like that. I hate seeing or hearing the same thing over and over again. I don't listen to the (mainstream) radio because after a while you notice they're always playing the same songs. I don't understand how other people can stand that. Anyways, trying to have something fresh every new video was getting pretty hard since I would say I'm not really a person with lots of creativity. So I guess one day I just randomly thought about doing something with storyboards.
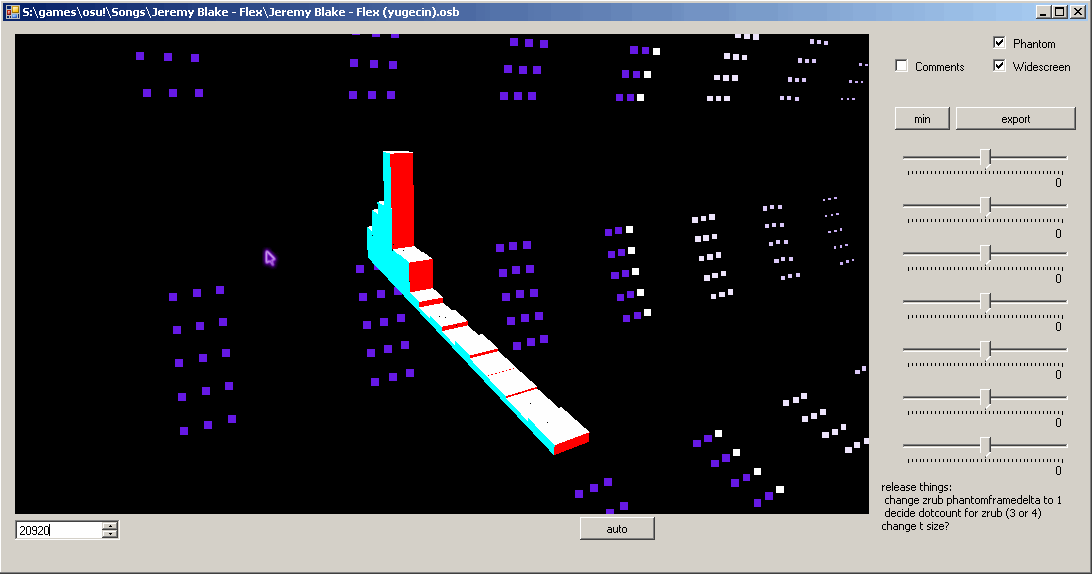
I'm an avid follower of the demoscene and the first idea I had (I think) was to try to remake the demo "What are you syncing about?" by Ninjadev, or at least some of the 2d parts. I saw it being released on the live stream of the Revision 2017 demoparty. It was very nice to watch and it looked like it would be possible to remake some of the parts in an osu! storyboard. Especially the spaceship part that starts at 1m15s would be very nice to see. I managed to hand-write storyboard commands to make everything (except for the cubes and text) up to the 30s mark. The 3d pink-ish 'floor' was pretty easy to fake with a few rectangular sprites. But the cubes are a different story.
I had to get the cubes working. Otherwise there would be nothing special at all about my storyboard. After all, it doesn't really have a story or complements the beatmap that goes with it, because I wasn't going to make a beatmap, just a storyboard. So it had to have at least something that would be considered an 'achievement' or something that hasn't been done before. I made some kind of helper program that would draw a wireframe cube which I could rotate to try to match the cube in the video.
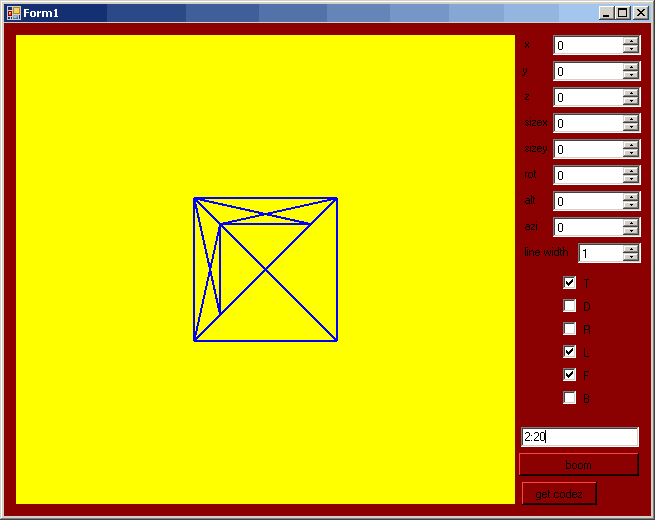
Yeah that looks horrible...
Note that the yellow background actually ends up being transparent,
so I could try to match the cube with whatever is behind it.
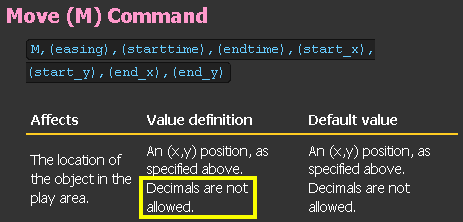
I tried but the result looked horrible. The main culprit was that I thought that move commands did not allow decimal numbers (spoiler: they do), which is pretty essential if you want to have a good-looking wireframe cube. I blame the osu!wiki for this. For some reason it stated that move commands do not allow decimals. (I've submitted a pull request: ppy/osu-wiki PR#1660 to fix this). I think I did try to use decimal numbers, but it gave an error when osu! tried to parse the storyboard. Decimals are allowed, so osu! shouldn't throw an error. I guess it's either a false memory or I managed to mess up something else that made the command invalid.
I curse whoever wrote this.
After failing that I think I just ditched the project, because it wasn't going anywhere. No cubes, no glory.
robin_be: meh apparently doing 3d stuff in storyboards is quite hard
July 16, 2017
February 2018 #
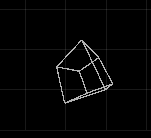
After 7 months, I started looking into this again. Not sure how and why, that's just what my git log says. On the 25th I made the first commit in that repository, and it already had the projection code I would use for the rest of this project. (More on that in the next section). Two days later I had a wireframe cube storyboard that looked horrible because, again, I still didn't know decimals were allowed in move commands. (Also I didn't scale the line width down to 1 pixel so it looked extra bad).

It's a cube, but it doesn't really look good.
March 2018 #
I then had the idea of making a large grid of pixels to make a cube. I think. At least that's what happened, but I don't remember what I was thinking at that time.
An actual cube, amazing.
It looked pretty good. It was relatively small, too. There were a few artifacts though. Sometimes a few pixels would stay black for a frame when they should change color. This was because I already tried to save some bytes, but it was done in a way that basically said that the color should be black for 0 milliseconds, and somehow it actually showed black when running it. This was fixed (way) later when Emily gave me some pointers on compressing.
robin_be: this may have potential
March 4, 2018
May 2018 #
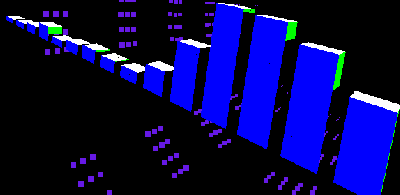
After more weeks of hibernation and very low activity, I used some FFT output for an attempt to make a 3d spectrum. The result is... a spectrum, but too low quality to actually use. I could of course decrease the pixel size, but that would enlarge the storyboard size. That was something to worry for later though, first I needed more things to actually make something that would be interesting.
Every good storyboard needs a spectrum, right?
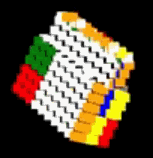
On a very sunny sunday, I went outside and spent a good two hours solving my rubik's cube. The reason it took so long was because I was trying to note down every move I made, so I can use that to scramble and solve a rubik's cube in the storyboard. But I kept messing up, either by writing down wrong moves, or by messing up while redoing the moves I wrote down. Eventually I have a series of moves that split up into two branches, then came together again, only to be split again in two branches. So then I had to figure out what parts of what branches were correct. I didn't want to start over again because this scramble and solution didn't have many moves and I knew I had to keep the amount of moves low so that the rubik's cube scene wouldn't become too long. So yeah, two (if not more) hours...
What a beautiful day that was.
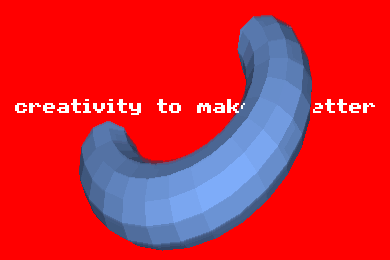
One other shape I had in mind to use somewhere in the storyboard was a torus. It was relatively easy to generate points to make one, as expected. The result came out to be pretty nice.
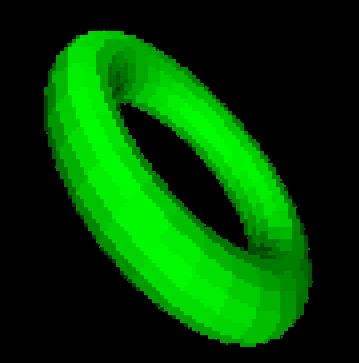
Anyone fancy a torus?
June 2018 #
As for song choice, I had been looking at some tracks by Renard and lapfox tracks etc in an attempt to find something energetic that would fit with a demoscene-y storyboard. To get some inspiration for what to do in my storyboard, I was regulary looking at BGA videos . Eventually I stumbled upon sky_delta - Exordium. This seemed like a really nice song to complement a demo-ish storyboard, so this became my new pick. It also gave me some new ideas of things I could do (does the tetrahedron flying through the tunnel look familiar?).
July 2018 #
In July, I flew to Norway and went to the Solskogen demoparty together with Emily (best few days of my life \o/). While being there, I told her what I was trying to do and showed what I had, which was basically only a pixelated cube and a shaded torus. It was kind of a funny moment when I explained that I was basically coloring pixel sprites in order to display a spinning cube... :D. When I told her about the decimals thing, she checked the source and actually saw that it does accept decimals. I'm not sure what happened but I don't think I tried to test or use it after she told me...
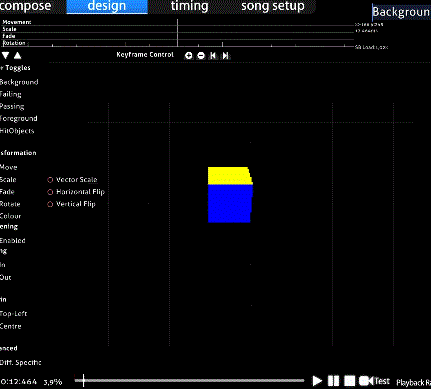
About two weeks after that, things really took off. Emily tried to make a wireframe cube. I was pretty sure it wasn't going to work, since I still believed that decimals weren't possible in move commands, so I thought it couldn't possibly look good. She took some old javascript code to draw a 3d cube and took that as base to generate a short storyboard. We were in a call at that time and I was helping a bit with the math aspect. It was getting pretty late so I went to bed. The next day when I opened Discord, I was greeted with the following picture and an accompanying storyboard file.
Yup, that's one good looking cube.
Seeing that was a magic moment to me. All I had seen before was my own attempt, which was horrible. Now Emily made a cube with lines that are joined perfectly. It was amazing.
robin_be: omg D:
robin_be: fuck me for thinking it's not possible
robin_be: I bow to your 1337ness _O_
July 27, 2018
Barely a day later Emily found a method of making opaque surfaces. After that I basically worked on it every day, because now I knew it was possible to do some more awesome things. Also because I finally managed to fix the whole rubik's cube movement code. It took me a looooong time to get that right and it was very demotivating since nothing I thought of seemed to work.
Commit history of the project's repository.
August 2018 #
In the beginning of August, the song of choice changed one last time. I am subscribed to a YouTube channel named Red Means Recording because the person behind it makes some interesting videos wherein he makes music using some interesting synthesizer things (I don't actually know much about it, but I like what he's creating...). One day he uploaded this video: I Made YouTube Library Music For You . I took a look at it, because why not, and it had a few songs that I though were suitable as music for this project. When I heard "Flex", I instantly thought I found something. It has some nice buildups, which can be useful for demo-ish stuffs, and it's a pretty nice song overall. It is a bit long, but I figured I didn't have to fill the entire length. It ended up being the song for the final version.
Backstory and timeline (continuation)
The storyboard and video were published on August 26th.
Techniques and approach #
To make life easier, I made two important (no-brainer) decisions before even starting. One was that I was not just going something that would dump out storyboard commands, but a program that would actually render what I was coding. It would be incredibly time consuming and stupid if I had to export the storyboard and check in osu! everytime I did a little change. Not only that, but there's zero chance that I would get the storyboard commands correctly from the start, so that would make debugging very tedious and even more time consuming.
The other decision was that everything had to be deterministic. By that I mean that I should just be able to give a certain timestamp, and the program should calculate the result that should be visible on that specific timestamp. This means no state at all. It would be very stupid to not do it this way, because jumping around in time would mess up everything.
float startx = 100;
float endx = 500;
int endtime = 3000;
Cube cube = new Cube(startx, 0, 0);
void draw(int time) {
	cube.position.x += (endx - startx) / endtime;
	cube.draw();
}
Pseudocode, moving a cube the wrong (non-deterministic) way.
In the example above, if you would want to see what the scene looks like at time 2000, you would need to draw the scene for every millisecond until you get at time 2000. Otherwise the cube's position won't be correct, since it wouldn't have done the movements that are being made in the previous frames. This also means it's not possible to go back in time.
By using the code in the example below, you can seek as much as you want. The cube's position will always be correct for the given time, since it only depends on the time value and not on how many times the scene has rendered before.
float startx = 100;
float endx = 500;
int endtime = 3000;
Cube cube = new Cube(startx, 0, 0);
void draw(int time) {
	float progress = time / endtime;
	cube.position.x = (endx - startx) * progress;
	cube.draw();
}
Pseudocode, moving a cube the correct (deterministic) way.
That being said, generating all the storyboard commands works by rendering the scenes from start to end while collecting information about every object's position.
Application #
Looking around in the tunnel + spectrum scene
I decided to make the program in C#. I'm more familiar with Java, but C# seemed like the obvious choice since making GUI stuff is very easy using Visual Studio. For some reason I also thought painting things in C# was easier since I've done that before, but it's pretty simple to do that in Java too so I'm not sure what I was thinking. But somehow C# seemed like the best pick to do this because of the GUI and preview stuff.
The GUI itself is pretty simple. No need for anything complicated.
The most important parts are the PictureBox where everything gets
rendered and the NumericUpDown control in the bottom left,
to change the time. There are also quite a few TrackBars at
the right, which can be used anywhere in the code to change values to test
without having to recompile and restart the program. I didn't end up using
it much at all though. I think the only time I really had to use it was to
get the rotation movements correct in the very first scene with the wireframe
cube and text.
Mouse dragging events in the preview rectangle were saved so scenes could use that data to change angles, effectively allowing me to 'look around' in the world.
Moving Emily around :3c
Scenes #
The whole storyboard is divided in different scenes. For example, the tunnel is one scene, the rubik's cube is in a different scene, ... Each scene has its own start and stop time, so it will only be rendered if the current time falls inbetween that. Additionally, each scene has its own framedelta, so scenes can be rendered at a different FPS. Example: the heart is rendered at 7.4 FPS while the torus field gets 20 FPS.
Two scenes actually have a non-constant FPS. The tunnel scene starts with a framedelta of 900 so that it will have one frame at the start and one frame after the tunnel has flown in. That makes the fly-in effect look smooth because it's a single interpolation between 2 frames. After that, its framedelta changes to 300.
The torus field scene starts with a framedelta so that the second frame will be in sync with the audio, then it changes its framedelta so the third frame will be in sync with the audio, and then it changes the framedelta once more to the normal value to have a nice fps.
Note that this fps thing only applies when exporting to a storyboard, so it doesn't affect the preview in the application.
Exporting to storyboard #
As I kind of mentioned before, generating the storyboard is done by rendering the scenes every 5 milliseconds, starting from the scene with the earliest starttime to the scene with the latest endtime. While this is happening, sprites and commands are being generated and saved into lists.
Looking closer at the code, there is an Odot class (Object: dot),
which is used to track a dot. Other objects are Orect for rectangles
(3d rectangles so actually just 4 point filled polygons), Otri
(which is not used directly, each Orect makes 4 of these: see
Opaque surfaces) and Oline for a line
between two points. There's also Odottedrect which makes a field of
Odots inside a rectangle (this is only used in the
rubik's cube scene).
Odot dot;
public override void draw(SCENE scene) {
	float angle = scene.progress * 7f;
	vec3 pos = v3(30f * sin(angle), 20f * cos(angle), 100f);
	vec4 color = v4(1f, 0f, scene.progress, 1f);
	float size = 6f + 2f * scene.progress;
	vec4 p = project(pos);
	if (p.w > 95f) {
		dot.update(scene.time, color, p, size);
	} else {
		dot.update(scene.time, null, null, size);
	}
	dot.draw(scene.g);
}

public override void fin(Writer w) {
	dot.fin(w);
}
Sample scene that draws a dot spinning in 3d space.
This example scene has only one dot. It spins around in 3d space
(but this is not really noticable), the color changes from red at the start to
magenta at the end, and it grows from 6 units to 8
units in size. The dot only shows if its distance to the camera is more than
95 units (the w component of a vec4
projection result gets set to the distance from the projected point to the camera).
The dot.draw method is only needed to draw the dot inside the preview
in the application, it doesn't do anything during exporting.
The fin method gets called after everything is rendered and the sprite
should process the commands and write it to the storyboard file.
Sprite,Foreground,Centre,d,0,0
_M,0,0,,320,224
_C,0,0,,255,0,0
_M,0,100,,396.6,224
_C,0,100,,255,0,25
_M,0,200,300,450.7,224
_C,0,200,,255,0,51
_S,0,200,,1.1
Sprite,Foreground,Centre,d,0,0
_M,0,700,,190.1,224
_C,0,700,,255,0,178
_S,0,700,,1.2
_M,0,800,,245.1,224
_C,0,800,,255,0,204
_S,0,800,,1.3
_M,0,900,1000,321.9,224
_C,0,900,,255,0,229
Scene above exported to a storyboard.
Note: this storyboard code is partially compressed, see Compression for more information.
This scene was set to have a framedelta of 100.
The resulting storyboard has 2 sprites to represent this single dot.
This is because the dot is not visible during some time (when the distance to the
camera is less than or equal to 95 units, as written in the scene's code).
It is of course possible to just hide the sprite and reuse it later when it becomes
visible again. I did this in the beginning, but the generated storyboard is larger
when doing this as opposed to just ditching the old sprite and making a new one when
needed again.
Every time dot.update was called, it checked for every property
(position, color, opacity, scale) if the value is too different from the value in the
previous command. If so, it will generate a new command for the property and add it to
the list of commands. This is noticable for the scale command. While there are move and
color commands for every frame, there are only 3 scale commands. This is because the value
was rounded (in this case) to have only one decimal, and it is of course not needed to add
a command every frame if the value didn't change from the previous frame/command.
Note that this actually needs another scale command in the beginning to have a correct start
value, see Default value quirk for details.
Techniques and approach > Exporting to storyboard
Last frame adjustments #
In almost every command in the generated example above, there is no endtime specified. This is because the endtime should be the same as the starttime, and if these are the same, the endtime can just be omitted to save space (see also End time and end values). Only the last move command of both sprites has a different endtime. The reason behind this is that sprites are only visible from their lowest starttime in any command to the highest endtime in any command. This means that if the latest endtime is 900, the sprite will be visible at time 900 and disappear at time 901. But in this case, 900 is the time where the last frame starts, and that frame should also be visible for 100ms, so that frame should be visible from time 900 to 1000 (or rather, 999). This means the last frame will never be shown (or just for a millisecond). This leads to missing sprites, broken objects, and this potentially leaves a blank few milliseconds in the storyboard if that frame is the last one of its scene. To fix this, the last command (in this case, the last move command), will have its endtime changed to the time that the frame should end.
Techniques and approach > Exporting to storyboard
Adding interpolation #
Only setting values at specific times using commands is not that great to make movement. To have motion that's more smooth, it would need a lot of commands with a tiny framedelta. Another options is to add (or rather, use) interpolation. Adding interpolation between the 2d projected positions isn't very correct, but that incorrectness is not so noticable. At least for the dots, if I try to add interpolation to the 3d objects (spectrum, heart, text), it fails miserably as expected. This is because those need very precise position / scaling / rotation, which is not possible to interpolate (see Opaque surfaces).
Sprite,Foreground,Centre,d,0,0
_M,0,0,100,320,224,396.6,224
_C,0,0,,255,0,0
_M,0,100,200,396.6,224,450.7,224
_C,0,100,,255,0,25
_C,0,200,,255,0,51
_S,0,200,,1.1
Sprite,Foreground,Centre,d,0,0
_M,0,700,800,190.1,224,245.1,224
_C,0,700,,255,0,178
_S,0,700,800,1.2,1.3
_M,0,800,900,245.1,224,321.9,224
_C,0,800,,255,0,204
_C,0,900,,255,0,229
Same scene as before, but with movement and scaling easing applied.
While writing this, I just remembered I didn't add interpolation for the color because it was not needed, so only the move and scale commands are eased in this example. Now each move command has an endtime that is different from the starttime, and the end position is also different from the starting position. Same for the scale commands.
You may have noticed that the ending time is again wrong since the last frame for the first sprite is at time 300, but the last command only goes to time 200 (the same applies to the second sprite). This is because there is no next frame to interpolate to, so this is pretty much unavoidable. The last frame adjustment technique can't be used because that would add a still frame at the end while it was moving before. To minimize this though, the scene's time can be extended to be a bit longer, compensating for the missing frame's duration. If a sprite goes out of bounds, I'm also allowing one frame with out of bounds positions so it can interpolate to the edge of the screen instead of just disappearing. Same for when a sprite appears from an out of bounds position.
without interpolation:
100-200: A, 200-300: B, 300-400: C

with interpolation:
100-200: A->B, 200-300: B->C, 300-400: nothing to interpolate C to
More clear example why the last frame is missing when interpolating.
Techniques and approach > Exporting to storyboard
Phantom frames #
An issue showed up once I started interpolating positions, as shown in the picture below. The left image is one frame, the right image is the next frame. The image in the middle is what happens between those frames. All the squares are being interpolated from frame 1's position to the position they should be in frame 2. The problem is that some squares that are not visible in frame 1 should suddenly become visible while they're being transitioned into frame 2's position. But of course they aren't becoming visible since there's no frame that processes it at that point in time.
The same effect is also visible in the right image. The grey surface in between the cube's sections should still be visible. But this is a capture between that frame and the next frame, and since that grey surface is not visible in the next frame, it is already invisible because there's no position to interpolate to.
Black hole warning.
The solution I made was to introduce so-called "phantom frames". Frames that don't really exist. Every scene now also had a phantom framedelta. For most scenes, the value is the same as the framedelta because it doesn't need phantom processing. Every command that is generated by a phantom frame is marked as a phantom command. Since sprites are never reused, only the very first and last commands are being checked if they're phantom commands. If they are, they get "promoted" to a real command. All the other phantom commands are just ditched.
The result of doing this is that sprites can appear or disappear between actual frames, so scenario's like the one above won't happen (or rather, it won't be visible if the phantom framedelta is small enough).
The only scenes that used phantom frames/commands are the Rubik's cube and Starfield torus scenes.
Techniques and approach > Exporting to storyboard
Default value quirk #
At some point I saw something rather strange. Consider the following code.
Sprite,Foreground,Centre,d,100,200
_F,0,1000,,1
_M,0,5000,,200,200
_S,0,5000,,2
_C,0,5000,,255,0,255
_F,0,9000,,1
The idea is that the sprite shows up at the first second.
On the 5th second, it should be moved to the coordinates 200,200,
colored magenta and scaled to 2x the size. Then at the 9th second it should
disappear again.
Here's the weird thing: what actually happens is that the sprite shows up at
the first second (as expected), but it already is at position 200,200,
colored magenta and scaled to 2x the size. It seems like as soon as there is a
command for a property, the default value of that property will change to the
start values of that command. Take the scale command for example. One would
expect the default value for scaling is 1x, and it is. But as soon as there
is one scale command, like in the example above, somehow the default value
from the start is the value as seen in that first command (so 2x in this case).
This happens for every property, so here the 100,200 initial
position is also ignored because there's a move command later on. The default
color mask is white, but here the color is magenta from the start since there's
a color command and its start value is magenta.
I'm not sure if this is a bug or intended but it did cause me some headaches every now and then as to why some sprites were rotated/scaled/faded/colored incorrectly, until I remembered that this is a thing.
On the other side, I think this actually also made things easier for the phantom commands, since the color command for a phantom object is timed later than the time at which the object should appear.
Techniques and approach > Exporting to storyboard
Empty lines error #
I have no idea what to call this but for some reason osu! throws an error when the last non-empty line is a command and it's not followed by at least 2 empty lines.
[Events]
Sprite,Foreground,Centre,t.png,100,100
_F,0,0,10000,1,1
Osu! doesn't like this.
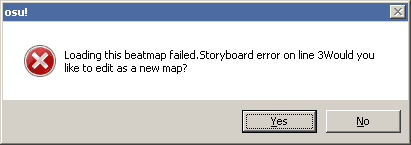
Yeap, osu! doesn't like this.
It shows this error dialog but if you click 'No' you see that everything did load. When adding two empty lines (or comment lines) at the end, this problem does not show up. When saving the map again, osu! adds comments to the storyboard file, so the last line is now a comment followed by a single empty line and suddenly it's not a problem anymore.
[Events]
//Background and Video events
//Storyboard Layer 0 (Background)
//Storyboard Layer 1 (Fail)
//Storyboard Layer 2 (Pass)
//Storyboard Layer 3 (Foreground)
Sprite,Foreground,Centre,"t.png",100,100
 F,0,0,10000,1
//Storyboard Sound Samples
Osu! does like this.
It's weird behavior but the reason I'm even mentioning this is that this exact issue made me lose a lot of time and caused lots of headaches as to why the storyboard didn't work when I tried to make a working storyboard at the very beginning of starting this whole project. Was not fun.
Techniques and approach > Exporting to storyboard
Output report #
During export, progress is printed every 5% to make it visible how much is done. This was quite useful because it takes several minutes to render the whole thing, most likely because nothing is really optimized since it's not really needed.
After everything is rendered, the commands are being processed per scene and some more output is shown. For every scene, it shows the name, fps, phantom fps, and how large it is (as in how many bytes). Then the total size is shown and how much each sprite is used. At the end the easing results are also shown (see Combining multiple fade/scale commands ): how many times it succeeded and failed, how many commands are saved, and how many bytes it saved.
The output when exporting to a storyboard file.
Type 'library' #
In the beginning I started with a P3D struct and some extension
methods so I could do things like P3D p = p1.sub(p2). When I see
other people's vector code, it's usually pretty object oriented and I don't
like that. Mine wasn't very object oriented, but still too much to my likings.
Luckily I remembered C# has operator overloading (and properties!), so it's
actually possible to write these things like we can in shader code. At this
point I was very happy I chose to do this in C# rather than Java, since this
isn't possible in Java in the current year.
vec3 dp = v3(0f);
float pr = progress(134000, 138200, scene.time);
vec3 fr = v3(2 * -35f, 25f, -10f);
vec3 to = v3(2 * 35f, 25f, -10f);
dp += lerp(fr, to, eq_cub(pr, v2(.2f, .4f), v2(.9f, .6f))) * 2f;
vec3 lookat = v3(-10f);
lookat.xy *= cos(pr * TWOPI);
vec3 dir = dp - lookat;
vec3 basecolor = lerp(v3(0f), v3(.6f, .4f, 1f), scene.progress);
vec4 color = v4(basecolor, 1f);
Random code showing how things are being done.
v3() is method that allows me to write new vec3()
but shorter. Same for v2() and v4() (yes I made
those classes with lowercase name because it looks better, #shaders, fight me).
progress() is basically a reversed lerp().
eq_cub() is a cubic bezier interpolation with 2 given
vec2s that define the curve. Thanks to operator overloading
I can do things like vec3 - vec3 * number.
In projects like these, I like to put everything inside the same partial class.
This basically creates a global scope and allows me to simply write
rad(x) instead of something stupid like MathHelper.rad(x).
I wrote some simple functions so I can just do cos(x) instead of
(float) Math.cos(x). Not doing this makes me insane.
dp += lerp(fr, to, eq_cub(pr, v2(.2f, .4f), v2(.9f, .6f))) * 2f;
vec3 lookat = v3(-10f);
lookat.xy *= cos(pr * TWOPI);
Three lines from the previous example showing simplicity.
dp += Utils.Lerp(fr, to, Equations.Cubic(pr, new Vector2f(.2f, .4f), new Vector2f(.9f, .6f))) * 2f;
Vector3f lookat = new Vector3f(-10f);
lookat.XY *= (float) Math.Cos(pr * (float) Math.PI * 2f);
Same code as before, but in a way that I'd see most people write it
My choice is instantly made. Another option is to use static imports, but that only works since C# 6.0 and I don't use that.
3d projection #
I don't know the full theory behind 3d projection. I also didn't want to use some library to do it and my Google fu seems to weak to find just a piece of code to simply project 3d coordinates into a 2d space. I have been messing around a lot with Grand Theft Auto: San Andreas since forever now, and I did some things that involved 3d projection. In SA, I just had to read out the values that are in the camera view matrix in some place in memory and multiply the matrix with a 3d point to get the projected result.
So instead of searching for how to do 3d projection, the idea became to move the camera in SA and basically export the camera view matrix to a file. Then import it in the application and use it to multiply some vectors.
robin_be: "use the tools that you have" on a whole new level
March 4, 2018
I made a CLEO script to move the camera and read the data to send it to a CLEO plugin that would write it to a file. For the interested, the code for this can be found in my scmcleoscripts repository .
0920: point_camera 0.0 0.0 100.0 transverse_to 0.0 0.0 100.0 time 10000 smooth_transition 0
0936: set_camera 0.0 -100.0 100.0 position_to 0.0 -100.0 100.0 time 10000 smooth_transition 0
Moving the game camera using III-era mission code, Sanny Builder syntax.
068D: get_camera_position_to 4@ 5@ 6@

{$O 0DDF=20,%1d% %2d% %3d% %4d% %5d% %6d% %7d% %8d% %9d% %10d% %11d% %12d% %13d% %14d% %15d% %16d% %17d% %18d% %19d% %20d%}
2@ = 0xB6FA2C
for 0@ = 0 to 15
	0A8D: 10@(0@,1i) = read_memory 2@ size 4 virtual_protect 0
	2@ += 4
end
0DDF: 33@ 4@ 5@ 6@ 10@ 11@ 12@ 13@ 14@ 15@ 16@ 17@ 18@ 19@ 20@ 21@ 22@ 23@ 24@ 25@
Reading the camera view matrix into variables and sending it to the plugin.
In the last code block, 0DDF is an opcode that is registered by the
plugin that will write all the sent floats to the file. 33@ is a
variable that holds the current time. The application then uses that generated
file and read all the data. Every time before a frame gets rendered, the time
is checked and the correct matrix is then used to perform the projection
multiplication.
At first the plan was to move the camera in SA because it's not that hard to
do that. But after a while it became clear that I was not going to move the
camera in SA, but rather use rotations in the scenes to move the world instead
of using the camera. In the end, the whole data file is not used anymore and
the projection multiplication is always done with the same matrix values.
The camera is set at 0.0, -100.0, 100.0 and looking at
0.0, 0.0, 100.0, with the up, left, at vectors being respectively
0,0,1, 1,0,0, 0,1,0.
public static vec4 project(vec3 p) {
	vec4 n = v4();
	n.x = 49.999996f + p.y * .5f + p.x * .714074f;
	n.y = 176.946487f + p.z * -1.269465f + p.y * .5f;
	n.z = 100f + p.y;
	n.w = distance(p, campos);
	if (n.z == 0) {
		n.z = -1f;
	}
	float f = 1f / n.z;
	n.x *= f * 640f;
	n.y *= f * 448f;
	return n;
}
The final projection code used.
Techniques and approach > 3d projection
Intermezzo: .NET float parsing bullshit #
robin_be: (times I have been fucked by C# treating a comma as decimal separator for float.Parse() and using a . as thousand separator)++
March 4, 2018
For some reason C# (or .NET in general?) parses floats by using the 'Region and Language' that has been setup in the control panel. In my case, that means it would use a comma as decimal separator and a period as thousand separator. It's a pretty easy fix but for some reason it usually takes me a while to realize that that's the reason why I'm getting strange values when I try to read floats from text files.
var c = (CultureInfo) Thread.CurrentThread.CurrentCulture.Clone();
c.NumberFormat.NumberDecimalSeparator = ".";
Thread.CurrentThread.CurrentCulture = c;
Take that, annoying region and language settings!
Rasterisation #
To make an actual opaque cube, I thought of just having lots of square sprites in a large grid, effectively having a matrix of pixels, or (as I call it) a pixelscreen. In order to do that, I needed a rasterizer. I found a nice tutorial video on how to make one: YouTube: 3D Programming Fundamentals [Triangle Rasterization] Tutorial 5 . The videos in that series are quite nice. They're also pretty to the point. The videos are maybe slightly long but I just look at the theory section and skip everything else and then just go implement it myself using the theory I just learned.
![]()
Pixelscreen using pixel sizes of 2, 6, 10, 6.
Opaque surfaces #
One day after Emily showed me her wireframe cube, she came up with a method to draw any 4 point polygon with just 4 right triangles. It's actually very simple but you just have to think of it. The idea is that every triangle can be made with two right triangles by splitting the longest side in two. Since a (skewed) rectangle can be easily split into two triangles, at the end all we need is one right triangle sprite and use 4 of those to make any skewed rectangle.
How 12 right triangles can make a cube
(this is the ztestcube3 scene slightly modified).
After messing with positioning, rotation and scaling, I made it work in the storyboard
with a 100x100 right triangle using the BottomLeft origin.
Scaling and rotation being applied to the triangles.
Opaque 3d objects #
A cube is easy in the sense that it doesn't have any overlapping surfaces. But using multiple cubes or objects comes with overlapping issues. In storyboard code, a sprite will be drawn on top of any other sprite that was declared before. So the order of the declarations in the file affects the overlapping.
For example, for the 3d text scene I could order the declarations from right to left or left to right. Either way comes with issues because the last ones will overlap the previous ones.

Drawing order from right to left and left to right. Both have overlapping issues.
This was easy to fix for the pixelscreen, I just used a z-buffer for that. But in this case it's not possible to use a z-buffer since you can't draw a part of a sprite in osu!.
The way I fixed this was to add a second copy of every triangle (only when it's actually needed of couse). When the left side of the cube should be culled, it uses the copy in the left-to-right batch. If it shouldn't be culled, it uses the copy in the right-to-left batch. In the storyboard file, I dumped all the sprites used for right-to-left first, followed by all the sprites used for left-to-right. By rendering the right copy at the right time, no overlapping issues appeared (except perhaps in the middle at the part where they join).
Note that there are still overlapping issues, but vertically instead of horizontally. In theory I think that should be fixable by having more batches where the vertical order changes too. I didn't really need this because at the end that issue was never visible with camera angles that I used.

The same text but using both copies.
The part with the grey background are sprites from the right-to-left group.
The overlapping is actually visible at the end of the heart rotation, just before the greetings part. I didn't bother adding overlapping correction to that part because it's slightly more complicated than having a few cubes horizontally next to each other and it wasn't too visible thanks to the camera angles.
Culling bug #
I noticed a strange problem when I was drawing the cube in the very beginning. Sometimes some random parts of surfaces that shouldn't be visible popped up.

Yea that cyan line-ish thing shouldn't be there.
After I while I finally found out that I made a mistake in the cross product calculations, used for backface culling.

Oops.
yugecin: aaaaaaa
yugecin: that second `-` should be a `*`
yugecin: good thing I figured that out before going bonkers on debugging
yugecin: actually I was preparing debugging and saw it xd
March 4, 2018
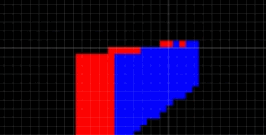
But after that fix there was still a culling issue that showed up very rarely. Sometimes it would show entire triangles that shouldn't be visible and at other times it wouldn't show them while they should be visible.

That on the left shouldn't be there, on the right the top is missing.
I had a hard time finding the cause here so I let it be like this for 4 months until I finally found the culprit. As it turns out, I made the same mistake twice. This time it took me longer to find the issue though (maybe you noticed it in the previous image?).

Oops2.
yugecin: aaaaaaaaaa I got the same issue again with my cross product like the one I told you about .. 4 months ago.. where the last minus should be multiplication
yugecin: only this time I wasted way more time debugging on it
yugecin: actually its not the same exact mistake
yugecin: turns out I did it wrong 2 times
yugecin: but on the 2nd place it had a way more subtle result
August 2, 2018
FFT #
Since I also wanted to add a spectrum or something with music, it would be nice if I had some audio data. At first I used fftexport, but somehow I couldn't get it right, the result seemed a bit off. Maybe I used wrong settings (I have no idea about anything audio related) or maybe I failed to parse the resulting file correctly (although the result was decent enough so it would be impressive if I managed to do that wrong and still get somewhat accurate results).
In the end I just used spectrumGenerator made by someone named XinCrin. This tool can generate storyboard commands that will display a spectrum given the settings you feed it. Then I made a little program (in Java) that parses said generated storyboard file and makes a file with raw values, which I then used in my application.
Font rendering #
Throwback to 2015, when we had to make a group project in school. Every group had to make the same thing, a puzzle bobble game. Most of the groups did this by moving UI objects around (which was actually also the method that the teachers used and told us to use if we didn't know how to do it...). Our group, however, decided to make everything ourselves. We just used one big canvas (javafx) and made our own UI components. We also decided to go full retro.
Puzzle bobble project showing the same font rendering (and Rickroll easter egg in the background).
Actual gameplay for the curious people.
You may notice that the text in these images are very similar to the text in my storyboard. That's because they are in fact using the same font. It's a bitmap font which is used in the BBC micro. I basically copied the old code I wrote for this project and converted it to C# for use in the storyboard.

BBC micro mode 1 font.
Since it's a bitmap font, I decided to store it in a binary format. The first byte in the font file is how tall the characters are, the charheight. After that are the actual characters stored. Each character starts with one byte which describes the width of the character. Then come a number of bytes, the same amount as charheight. Each byte describes which pixel needs to be on for that row in the character. After that comes either the next character or EOF.
To use it you only need to do some bitwise operations. Basic stuff. Like come on, if you consider yourself a programmer you should be familiar with working on the bits and bytes level (although nowadays that seems to get less and less relevant)

Example of how the & character is saved.
Scene breakdown #
Intro cube #
Despite being the first scene, this one was made after all the others were already done. I had to come up with something good to 'fill' the first 16 seconds of the music. There are quite some nice things afterwards, but I feel like the beginning should be interesting enough too for people to stick around and watch everything that comes after it. I thought some nice intro with some pre-credits or other text would be nice. The intro of the Devolution demo by Kewlers is very nice: YouTube: Devolution by Kewlers, but at this point I felt like I copied enough already so I didn't want to copy another thing (you'll see what I mean when you read about the other scenes...).
I realized I didn't really have cube (other than the rubik's cube) so I played with the idea of having a cube. Maybe opaque, but I wanted to only show opaque 3d objects later for a more 'surprise' thing. Maybe pixelated, but I wasn't sure if that would look good for the start. So I ended up with having a wireframe cube.
Just fading in the cube would be a bit lame, so I made the lines 'grow' until they formed a complete cube. It looked nice but it was a bit too much with all the lines once the text started, so I decided to enable culling once the cube is completed.
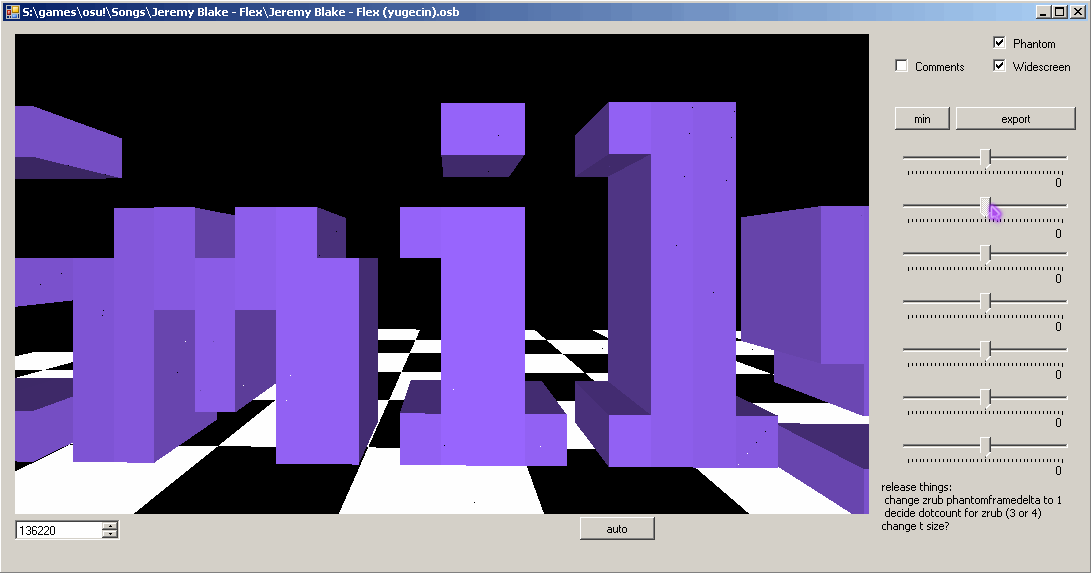
The initial idea was to add the text on the actual sides of the cube. Since everything is made step by step, moving the text from the middle to the sides was something that would be done at the end, but I quite liked how it looked with the text being in the middle so I just left it like that. It kinda reminded me of the game Antichamber.
The non-Euclidean world in Antichamber.
To make the effect, I used a pixelscreen to draw a filled cube. Then the text pixels would be drawn depending on if the color of the pixel's position matches with the color of the cube side to which the text belongs. Of course the pixelscreen isn't drawn or exported to the storyboard, it's just non-visibly being computed.
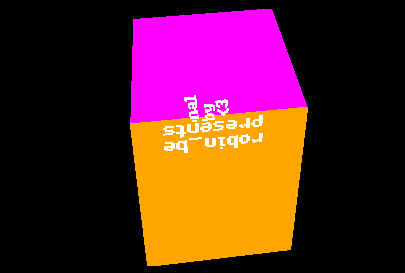
Text pixels are being drawn when their color matches.
As for the text itself, I didn't really know what to put there. I wasn't sure about the 'robin_be presents' but I had no idea what else to put there. Emily at one point said that I should make it clear that the whole storyboard is made out of only 4 sprites, so this was a nice place to put it in. Also a special greeting to Emily of course :3.
Tunnel #
Every demo needs a tunnel right?
I got the basic tunnel concept from a demo, YouTube: Elude - Rise And Shine | Demoscene (at 0:34). The fly-in effect was a nice way to make it appear and it fitted nicely with the music.
I really like the lighting effect that's going on in the tunnel. I got that idea from the lighting show at Rampage 2017/Zillion.xxx 2017. I didn't go there, but I saw it on different videos. Example: (epilepsy warning) YouTube: Zillion - The Final Rave PART 1 (at 9:18). At the end of the tunnel, segments 'break out' and I got that idea from yet another demo: YouTube: Revision 2018 - Concert - Logicoma (at 14:37) (actually this is a scene from a demo, edited to be used as background visuals for this (awesome) concert during Revision 2018).
Fun fact: the tunnel is rendered at 3fps, but it looks smooth thanks to interpolation. The lighting effect, however, is done by inserting commands into the sprite directly. This is one of the only places where commands are made 'manually'.
foreach (int lighttime in lighttimes) {
	// ...
	ColorCommand cc;
	cc = new ColorCommand(lightstart, lightend, v3(1f), color);
	cc.easing = eq2num(eq_in_quad);
	dots[idx].addCommandOverride(cc);
}
Color commands being added to the sprite.
Spectrum #
It's a spectrum. I've read somewhere that spectrums are not really special anymore since there are tools to generate them and now every storyboard has one. So I thought let's do something special: an opaque 3d spectrum.
Thanks to the Opaque 3d objects technique this looked quite good, but it still had some issues at the point where the two copies joined.
See the lime line between the blue bars? Yeah that ain't good.
The solution to that was to change the height of the sides to only show what is needed to be shown. This way no overlapping was possible due to overlapping sides.
Much better. (bars separated to clearly show the height change at the sides)
Lots of people complained made the remark that the fps is quite low, but I actually like it like that. Ok, maybe the rotation and movement should be a bit smoother, but if the bar heights are updated faster (like they are in the highfps version) it doesn't look as good anymore in my opinion (but of course I guess I could've fixed that and still made it move smoother in the highfps version).
Rubik's cube #
This one was quite the journey. It was the first real scene I made after messing around a lot with plain test cubes and I took a shitton of time to make the movements work. In fact this took so many tries I lost lots of motivation at different times. Then I managed to finally make it work completely just after Emily showed me her first wireframe cube.
The way this one works is basically this: every time it's being rendered, all moves that need to be done up until the time that is requested by the frame are being done on the unscrambled cube. After drawing, all positions are being reset so the next time rendering can start again from a 'fresh' cube. This was basically essential for the scene to be deterministic.
F R B D R' L' T2 R FM' TMH L D' B L' F FM R B' D L' FM D F' D TMV D2 TMV' F L' F' L D' R D' R2 FM'2 R T2 TMV D2 TMV' R FM2 R' D2 L D' L' F L' F' L < L D' L' F L' F' L D' R' D R F' R F R' < < D L D' L' F L' F' L T' ^ ^ > > F T R T' R' F' R' T2 R T R' T R TMV2 T TMV2 D2 TMV'2 T TMV'2 D2 R D2 R' B' D2 B T2 B' D2 B R D2 R'
The moves I wrote down.
The moves (which I wrote down when I solved my physical cube) (yes I know this is not the
correct notation for the moves but they made sense for me ok?) were parsed from a file.
The >, <, ^ symbols mean that I rotated the
cube in that way while I was solving it.
The code ended up to be pretty unreadable which was quite fun to do. It's not needed to edit the code once it's done anwyways so why not. At some points it actually made the code more clean because it got rid of repetitions. You can view the full source in the zrub.cs file. It's one big mess :D
int[,][] movmat =
	{{new int[]{0,0,0,0,0,2},new int[]{0,0,1,1,0,2},new int[]{0,0,2,2,0,2},
	  new int[]{1,0,2,2,0,1},new int[]{2,0,2,2,0,0},new int[]{2,0,1,1,0,0},
	  new int[]{2,0,0,0,0,0},new int[]{1,0,0,0,0,1},new int[]{1,0,1,1,0,1}},
	 {new int[]{0,0,2,0,2,2},new int[]{0,0,1,0,1,2},new int[]{0,0,0,0,0,2},
	  new int[]{0,1,0,0,0,1},new int[]{0,2,0,0,0,0},new int[]{0,2,1,0,1,0},
	  new int[]{0,2,2,0,2,0},new int[]{0,1,2,0,2,1},new int[]{0,1,1,0,1,1}},
	 {new int[]{0,0,0,0,2,0},new int[]{0,1,0,1,2,0},new int[]{0,2,0,2,2,0},
	  new int[]{1,2,0,2,1,0},new int[]{2,2,0,2,0,0},new int[]{2,1,0,1,0,0},
	  new int[]{2,0,0,0,0,0},new int[]{1,0,0,0,1,0},new int[]{1,1,0,1,1,0}}};
int[][] emovmat =
	{new int[]{0,0,0},new int[]{0,0,0},new int[]{2,0,0},
	 new int[]{0,0,2},new int[]{0,0,0},new int[]{0,2,0},
	 new int[]{0,0,1},new int[]{0,1,0},new int[]{1,0,0}};
int[][] rotmat =
	{new int[]{3,0,1,2,7,4,5,6},
	 new int[]{3,2,7,4,5,0,1,6},
	 new int[]{1,6,7,2,3,0,5,4}};
int[] rmref = {0,1,1,2,2,0,2,0,1};
int[] dirfix = {0,2,0,0,2,2,0,2,2};
Lots of arrays describing the way parts should be moved. I don't really like the jagged array notation in C#.
At the end I saw that it looked a bit buggy when one side is only slightly visible, it looks like the colors of the pixels changed a lot because of how small the visible side is due to the viewing angle. It's a bit unfortunate but it's how it is now.
Buggy part visible on the bottom and right sides.
Actually, now that I see that, it seems like it's a bug with the coloring of the dots. Because you can see all the white sides are either in the front face or at the part on the left, so there shouldn't be any white dots at the bottom or left face... Weird, but a little bit too late to fix that now.
Waves #
This one took me a long time too. I got the idea (I think) from yet another demo, one of my favorites: YouTube: The butterfly effect - Andromeda Software Development (ASD) (PPR) (at 0:33 but I suggest you watch the whole thing because it's beautiful). There's no way I could make it as nice as that though, but I wanted to add some wave-y things.
I spent a long time trying to make this look good using several tutorials about perlin noise, cubic noise, FFT, ... I messed a lot with parameters and values in an attempt to make it look somewhat good but nothing felt really amazing. At the end the code consisted mostly of parts coming from one blog post / tutorial: Using Person Noise to Generate 2D Terrain and Water . That post was only for 2D so I guess I failed to do it right in 3D so it doesn't look very amazing.
An early version of the waves rendered in an early-ish version of the application, 21 July 2018.
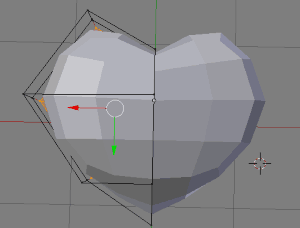
Heart #
The heart idea is also slightly inspired by another demo: YouTube: Elude "Step by Step" Amiga AGA/RTG Demo (Vampire 600 V2) (at 2:26). At this point in the song I wanted to show some 3d object, a torus or a heart or something else. It ended up being a heart.
I instantly had the idea to change the rendering method in sync with the song, so I made it render using a pixelscreen and a wireframe version at those points. I really like that part. It's actually the only place where I ended up actually showing a pixelscreen and it looks so good with the heart that I think that I should've showed more pixelscreen stuff. Oh well.
At some point I also made the heart beat in sync with the song (the beating does seem to be a bit bugged in the highfps version though, but I kind of made that version in a hurry). I also had the idea to start from an exploded heart and move in the pieces in the beginning to form the completed heart. I looks pretty nice and is somewhat fun and might be unexpected and surprising for the viewer to see that such an object can be made with just storyboard commands.
The heart was actually made in Blender. I have no experience with modeling (except from making an object and technical drawings in Autodesk Inventor back years ago in school), so I searched for a tutorial. I found and followed this tutorial: YouTube: Blender Easy Creating :: Heart Beat Animation (2.78c) . After a few tries of following what is being done in the video, I got slightly familiar with how to do basic stuff in Blender so at the end I managed to make a somewhat decent looking heart. I then exported it to an .obj file and parsed that in the application.
Blender skills are missing.
Greetings #
This is actually a special scene because the whole greetings scene is made by inserting commands rather then rendering objects and tracking the properties.
Since all the text is made using single pixels, the coloring effect turned out pretty good. This one also brought problems though, because of the Default value quirk. The coloring effected added a color command, and this was the only color command. Due to that default value quirk think, this made the whole text look pink from the beginning instead of white. To fix this, I also used the color command to fade in the text by changing the color from black to white and I removed the fade commands. That way the sprite colors were fixed because they're colored from the beginning.
The twinkle effect at the end is done by adding a storyboard loop to each pixel sprite.
It's the only place I used loops in this storyboard and it's nice to actually have a
place to use them. But once again, the default value quirk bit me at this point.
I started the loop by fading from 0 to 1, but since the
initial fade was replaced by a color command, this means the default value for the
fading ended up being 0, effectively making all the text invisible up
until the twinkle effect. So to counter that I swapped the loop around only making
it invisible after making it visible first. See
zgreet.cs#127
and the lines below that.
The names at the left are actually demogroups, the names at the right are single persons (except for all@Solskogen of course), either friends or demoscene related people or just persons I wanted to mention for some reason.
Imagine Blaze: 11t :(
A YouTube comment on my video.
Fun fact: when all this was only a vague idea in 2017, I wanted to release a storyboard like this on the 25th of July as a hommage to 11t, but I never made that goal (context).
Torus field #
And yet another scene that was inspired by a demo: YouTube: RAZOR 1911 - We Have Accidently Borrowed Your Votedisk . This one almost didn't see the light. I struggled a lot when trying to make this look smooth with good rotations. I also had problems with this becoming too big in size and not looking smooth or good because I needed to reduce the amount of lines per torus.
I almost ditched this scene when I failed to make good rotations, but luckily I restored this one later again because at the end this scene is the one where you really feel like you're in a 3d environment.
This part of the song it also a bit of a pinnacle, so this scene fits pretty well at that time. I also really enjoy how the toruses appear in sync with the music. The fade-in and out effect of the toruses in the distance also ended up looking really awesome in my opinion.
Checkerboard and 3d text #
This point in the song gets even more intensive so from the beginning I had the idea of adding more 'awesome' (debatable) 3d things at this part.
I did not really know what to put there so I just put my and Emily's name there. I always feel pretty narcissistic when I watch this part... This time it's not really related to a demo but I did get the idea for some of the rotations by a BGA: YouTube: [[BOFU2016]] GOODBOUNCE [[BGA]] (at 1:46).
The checkerboard is ... a checkerboard, nothing really special about it. I do think it adds to the scene because there are already so many scenes that just have a plain black background and this is something different I guess.
The text is somewhat special though. Instead of making a cube for each pixel, I made it so that it combines different cubes together vertically in order to reduce the amount of sprites. That ended up being a pretty effective way for saving some space.

The text, each 'cube' having a different color in an attempt to show how cubes are combined.
Starfield torus #
The last scene. The startfield is nothing really special, it's just dots coming closer to the camera. The torus itself is not very special either. The torus is sort of made out of rectangles and each rectangle is replaced by a single dot that has its position in the middle of its rectangle. The size of the dot is determined by the size of the projected rectangle, and the shade of the rectangle decides what color the dot will receive.
The real 'magic' part is how the scrolling text disappears behind the torus while the torus isn't even solid. This is once again done by using a pixelscreen and a colored surface. There is a non-rendered red surface being drawn onto the pixelscreen (but this whole pixelscreen is basically not being rendered at the end). The z-buffer makes the intersection between the torus and the surface look correct and so the text pixels only get drawn when the color on the pixelscreen at the text pixel's position is red.
Same magic trick as in the first scene.
The text in this scene is quite special too. Since it only scrolls horizontally, each pixel consist of only one single move command (MX). It also uses Phantom frames processing to correct the time when the pixel should show or hide. When processing all the generated commands, all the move commands are replaced by a single one with the start value of the first command and the end value of the last command.
4,3,1,2,0,260
_MX,0,150150,152025,214.3,0
4,3,1,2,0,264
_MX,0,146425,149775,638,255.1
4,3,1,2,0,264
_MX,0,150175,152000,209.4,0.9
4,3,1,2,0,264
_MX,0,146450,149800,637.1,254.3
4,3,1,2,0,264
_MX,0,150200,152025,208.6,0
Some of the commands generated for the scrolling text.
In retrospect the text is a bit negative but I, once again, had no idea what to put there...
Compression #
Everything about reducing the size of the resulting storyboard file.
Fun fact: when saving the beatmap using the editor in osu!, its size goes up from 27MB to 32.6MB (for the version without variables).
Line endings #
When I was messing with osb files in the very beginning to see how it all works,
I noticed the line endings and realised a very easy way to lose some weight is to
use LF instead of .NET's default CRLF. This saves one
byte per line, which may not seem like a lot, but this saves almost a full megabyte
since my storyboard ended up to be about 977K lines.
Sprite names #
Changing sprite names to save some space was also a no-brainer. The osu!wiki shows a
sample object declaration like this:
Sprite,Pass,Centre,"Text\Play2-HaveFunH.png",320,240. First of all,
if you're making a storyboard like this (that will have lots of object declarations),
why wouldn't you use a filename that's as short as possible? I've seen storyboard that
use filenames like SB\alien\spaceship.png. Maybe it might be a bit annoying
to use one letter filenames while you're working on it if you have many sprites (not
for me since keeping track of only 4 sprites is not that hard), but you can always change
the names to something shorter when it's finished.
So I gave my sprites each only one letter as filename. The wiki states that the quotes
are only really needed when the path has spaces in it, so I could ditch those too.
Me being curious tried to remove the extension as well, and that seems to work just fine.
So my object declarations looked more or less like this:
Sprite,Foreground,Centre,d,0,0.
Then I thought, what would happen if I use an empty filename? So I tried just that, and it
works too! I changed the most used sprite to just .png and loaded it by doing
Sprite,Foreground,Centre,,0,0. The only side effect that this seems to have
is that it crashes osu! when you try to open the sprite browser in the editor. You don't
even have to use the sprite, just having a filename with only an extension in the directory
makes this happen.
![]()
Check your string lengths!
After applying Variables, changing the sprite names to something as short as possible doesn't really matter much anymore but it's a fun thing to have, why not.
Sprite sizes #
This is not really related to the storyboard file, but why not make the sprite files
themselves as small as possible? One of my favorite tools to do this is
pngquant, which compresses png files and does this
really well. I also used this to compress the images I used in this blogpost and other
websites, to save bandwidth and speed up the loading time. Often I get a better result
with this tool than using the webp format.
I use Paint.NET for image editing (I shake my head at people who (illegally) use Adobe Photoshop to do simple image editing...), which adds 24 bytes of metadata to PNG files so everyone that looks at the PNG headers can see it was made with Paint.NET. It's not hard to remove that using a hex editor, so that's another easy 24 bytes per sprite.
When I changed my 3x3 sprite into a 2x2 sprite, I noticed that the filesize stayed the same
(122 bytes). I found that quite peculiar, so I mentioned it in the osu!fx discord. HoLLy
responded that I should use a bitmap, which would probably be a lot smaller. The BMP
header was a lot bigger than he expected, but the resulting file was still smaller,
at only 70 bytes. When I checked it in osu!, I saw that it didn't load the sprite.
It seems like it would only check for .png and maybe .jpg
files when there's no file extension in the object declaration. Then HoLLy saved the
day again, by saying I should just rename the file to a .png, since .NET
apparently uses 1 method to load all images. Renaming the file worked, so I now had a
sprite that was smaller than its PNG counterpart and I didn't have to specify the
extension in the object declarations.
Yes I know optimizing the sprite sizes by removing some bytes is nothing compared to the larger part but if it can be smaller with almost no effort, why not do it amirite? The fun sometimes lies in the small things.
Enum member values #
Back when we were at Solskogen, Emily found out that several values were parsed using
Enum.Parse. This allows us to write 4,3,1,d,0,0 instead of
Sprite,Foreground,Centre,d,0,0. Pretty neat, I would be surprised if
anyone found out about that before. I've always wondered why the object declarations
had to be written using those long words. It might make it easier to read the osb file
(for humans), but at the end storyboards can have so many objects it's just unnecessarily
taking up lots of space. But I guess the developers didn't really imagine people would add
lots of particles and (faux) 3d objects in their storyboards back when they made this 10+ years ago.
This also works for sections names, so [Events] can be written as [32],
[Variables] is [256], etc etc. All these values can be found nowadays
in the osu repository:
LegacyDecoder.cs in ppy/osu
.
Note that they messed it up there, the values for the sections are wrong.
protected enum Section
{
	Unknown = 0,
	General = 1,
	Colours = 2,
	Editor = 4,
	Metadata = 8,
	TimingPoints = 16,
	Events = 32,
	HitObjects = 64,
	Difficulty = 128,
	Variables = 256,
}
The correct values for the sections.
Emily also made a pull request to add the values in the osu!wiki: ppy/osu-wiki PR#1675.
End time and end values #
I'm not sure when this happened (it was definitely after Solskogen),
but Emily showed me that you can just leave out the end time if it's the same as
the start time. So you can minimize _F,0,10000,10000,0,1 to just
_F,0,10000,,0,1. Same with the end values, you can leave them out if
they're the same as the start values, thus
_M,0,2000,2000,174.1,232.2,174.1,232.2 becomes
_M,0,2000,,174.1,232.2 and so on.
This saved lots of space and also fixed a bug I had earlier. When I didn't know
about this, I also tried to save space by putting small values as the start values.
For example, to change the color to white I would write
_C,0,100,100,0,0,0,255,255,255. The initial values are set to 0
because one digit is two bytes less than three digits, and since the end time is the
same as the start time, I figured it shouldn't be visible that the start color was black.
It wasn't visible most of the times, but every once in a while there is a certain point
where all my sprites would turn black for a very short period. I'm not sure how that works,
since the interpolation duration is always 0ms, but it happened, so it was not the best way
to try to save some space. Thanks to this new method Emily told me about,
I was saving even more space and without the bugs I experienced earlier. Yay!
Shorthand discoveries #
When I was writing this post, I checked the osu!wiki for reference multiple times. Suddenly I noticed following line on the storyboard scripting commands page.

What?
I checked the whole page, but this is the only place that mentions these so-called "shorthands". I went to the osu-wiki repository on github and searched for "shorthand". I found out that there is a page that I've never seen before. It basically describes what I explained in the previous section, that you can leave out end times and end values when they're the same as the start time and start values, respectively.
But that page also mentioned a third case of shorthands, which is when a command has sequential equal value changes with the same interval. I'm having a hard time describing this so just check the following example.
// the 'normal' way
_F,0,1000,2000,0,0.5
_F,0,2000,3000,0.5,0
_F,0,3000,4000,0,1
_F,0,4000,5000,1,0

// the 'shorthand' way
_F,0,1000,2000,0,0.5,0,1,0
Holy compression.
I was amazed when I saw this. Sadly I already released the map and the video at this point, but I still implemented it. By using this, the map's size was reduced by another 3.5MB. This was to good to just leave it, so I updated the map on the website to include these changes.
This page about shorthands is not linked anywhere on the wiki though, so it's very hard to find. I was kind of slightly mad about this because I had no idea due to how bad the new osu wiki is made/linked. Some people were impressed that I managed to make this storyboard while it's only 25MB in size, but in reality it could've been 22MB in size without any difference in the resulting visuals.
To be more precise, the page is actually linked on the Sitemap page, but that page is not
linked anywhere. But wait, there's more! The Sitemap page is linked from a page named
Main_Page, but that page doesn't even exist on the live version, it only
exists in the osu!wiki repository. I don't even... I made a pull request:
osu-wiki PR#1661 to add a link to
the shorthand page, so hopefully that will be fixed soon.
Note: that pull request was merged before I even finished this blogpost, yey!
Initial position #
In an object declaration, one can specify the position of the sprite. Now of course
this doesn't have any meaning if the sprite is moved from the start, so this can be
set to 0,0 instead of the actual start location to save some quick bytes.
Actually it is useless in that case anyways because of the
Default value quirk. I have 34847 sprites like this,
so this saved about 146KB (34847x4.2 because 2 digits for each coordinate and on
(guessed) average 0.2 bytes per sprite in case negative coordinates are used because
its a widescreen storyboard).
If the sprite is only going to move in the x or y direction, one coordinate could be
set and the _MX or _MY command could be used to move the sprite.
This is what I did for the text in the Starfield torus scene.
I set the initial position's x coordinate to zero and the y coordinate to whatever y
position it should be on, and use the _MX command to move the sprite
horizontally. This saves about 5 bytes per pixel used to make the text (and there are
2725 of those so it saved 16KB).
In retrospect I thought I would've saved more if I didn't do that, because using Variables might saved more. But I checked (just now), and by using variables it could've saved at maximum (using my current configration) 5 bytes. Since there are lots of variable, I needed to use 2 byte identifiers because I ran out of characters. This means there was a high chance that it would've only saved 4 bytes instead of 5 bytes, so using this method was a good (lucky) call.
Rounding decimal values #
Another quick way to shave off some bytes is to reduce the amound of decimals. Very high precision is not always needed/noticed anyways. Only for the scenes with 3d opaque surfaces, like the spectrum and the heart, it is needed to have a high precision because otherwise the sprites wouldn't join nicely together and it would look slightly worse. I made it round to 5 decimals for these scenes, but even then it is sometimes visible that the sprites don't completely join. For the other scenes, it was mostly rounded to 1 decimal because it doesn't matter if the movement of the dots are slightly off.
public override void draw(SCENE scene) {
	ICommand.round_scale_decimals.Push(2);
	// ...
	ICommand.round_scale_decimals.Pop();
}

public override void fin(Writer w) {
	ICommand.round_scale_decimals.Push(2);
	// ...
	ICommand.round_scale_decimals.Pop();
}
How the rounding is dynamically configured.
Combining multiple fade/scale commands #
One more thing to save space (and actually make things smoother at the same time) is to combine series of fade/scale commands into only one command by applying an easing that fits with the way the value changes. Consider the following example:
Odot dot;
public override void draw(SCENE scene) {
	float angle = scene.progress * 7f;
	vec3 pos = v3(20f * sin(angle), 20f * cos(angle), 100f);
	vec4 p = project(pos);
	float size = progressx(130f, 70f, p.w) * 12f;
	dot.update(scene.time, v4(1f), p, size);
}
Simple scene with a spinning dot that gets larger as it gets closer to the camera.
4,3,1,d,0,0
_S,0,0,,0.3
_S,0,100,,0.5
_S,0,200,,0.8
_S,0,300,,1.3
_S,0,400,,1.6
_S,0,600,,1.3
_S,0,700,,0.8
_S,0,800,,0.5
_S,0,900,,0.3
Storyboard code generated by the above scene. Note that I removed the move commands for this example.
In the generated storyboard code you can see that the value goes up, and then goes down again. The idea is to split all these commands of the same category in batches where the value changes in the same direction (goes up or down). Then one single command gets made with the start data of the first one and the end data of the last one. For each batch, go through all possible easing equations that osu! has to offer and see by using which easing the values get the closest to the target values given at each command in the batch. The best one is being determined by the score given to it, which depends on the average difference and the maximum difference between the eased values and the target values.
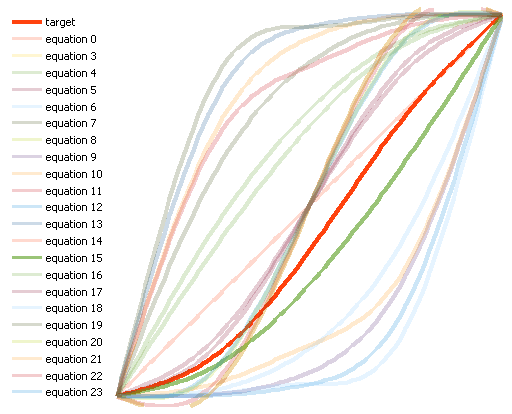
Graph with easings for the first batch.
Red is the target, green is the one with the best score.
Since the scale value in the previous example goes up once and then down once, the commands are split into two batches. The graph above is a visualisation of the first batch. The red line represents the target values, the green line represents the values with easing 15 applied, which is the easing with the best score.
The resulting two scale commands use easings 15 (sine in) and 16 (sine out), which makes sense since the dot's position (and thus size) was largely determined by a sine wave motion.
4,3,1,d,0,0
_S,15,0,400,0.33,1.62
_S,16,500,900,1.61,0.33
Storyboard commands for the same scene, but with easing as explained applied.
According to the Output report, combining commands like this was done 11655 times, saving 61211 commands and about 760KB. On top of the space savings, this also means the scaling or fading will be a bit smoother compared to chained linear interpolated commands.
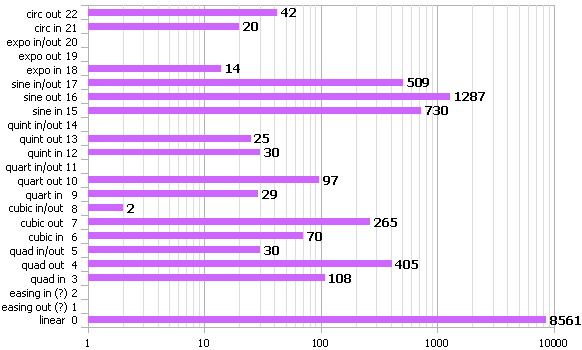
Graph showing how much each easing is applied (slightly off).
Note the logarithmic x-axis.
The reason that the linear interpolation was applied so many times is probably due to many batches only having two commands.
Now I'm wondering why I didn't try to do this with the move commands... On a second thought, this would be very hard to do for the move commands Fade and scale are only single float values, so it can only go up or down. That means it's relatively easy to split batches of commands depending on whether the value is going up or down. It would be way more complex to do this for move commands, since those have two values that change instead of only one.
Variables #
The wiki and the storyboard scripting official specifications forum post have a few words on variables. Basically it's telling that there's support for variables, but that it's very primitive. It's meant to be used to make life easier, for example for if you're using a specific color on different places. In that case you can make a variable and use that variable instead of needing to remember what the exact color combination was everytime you want to use it. It also makes it a bit easier to change the value everywhere it's used, because now you'd only have to change the variable.
It took a while to get started with variables though. After a long while,
we found out that the [Variables] sections needed to be before the
[Events] section. Kinda makes sense when thinking about it because the
storyboard file is probably processed sequentially.
From the information that we found, variables are supposed to have a $ prefix.
After some messing around, we found out that this isn't the case. Basically a line has
to contain a $ character for variables to be processed for that line.
This means you could make a sprite named $.png and every object declaration
line using that sprite will be processed for variables.
[256]
xposition=200
yposition=400
[32]
4,3,1,$,xposition,yposition
Working variables without the $ prefix.
Or if you already have a variable with a $ prefix on a line,
another variable on that line doesn't need the prefix because all variables are
processed when a line contains the $ character (similary to the case
above where the sprite name had that character in its name).
[256]
xposition=200
$yposition=400
[32]
4,3,1,b,xposition,$yposition
All you need is at least one $.
Variables are processed sequentially by using String.Replace in the
order that they're defined, so the following code won't work.
[256]
$a=200
$aa=400
[32]
4,3,1,b,$a,$aa
The result will be 4,3,1,b,200,200a, which will cause an error.
This also means variables can be nested, but only if the nested variable appears after the variable that nests it.
[256]
$fade=_F,0,$time,0,1
$scale=_S,0,$time,2,5
$time=2000,3000
[32]
4,3,1,b,0,0
$fade
$scale
If $time was defined before $fade or $scale
this would fail.
Of course using variables will make loading the map slower, especially if there are lots of them, which was definitely the case for my storyboard. I generated 554 variables and pretty much every line used a variable. Having osu! go through 554 variables for about a million lines made the loading time jump from about 3 seconds to roughly 45 seconds... :D
When saving the map, osu! tries to insert the variables into the storyboard code. However, we found out that this only happens if the value of the variable is preceded by a comma.
[256]
$pos=10
[32]
4,3,1,d,10,510
The line will be replaced to 4,3,1,d,$pos,510 when saving.
Generating variables #
I figured using variables was going to save quite a bit of space, so I just let the program generate lots of variables for some patterns. The first obvious things to replace with variables were object declarations and the loop commands that were using to let the text twinkle out in the Greetings scene. The two commands in those loops are used 3934 times. By putting those whole lines inside variables, I saved about 95KB.
Another few that I thought may help were the colors black and white, so I put
,255,255,255 and ,0,0,0 inside variables as well.
I didn't think it would save very much, but that did save about 108KB.
Then I also threw in all the possible object declarations and all the
commands followed by every number from 10 to 99. For example, there was
a variable for _M,0,10, _M,0,11, .. all the way up
to _M,0,99. Same thing for the scale, rotation, fade, color commands.

The output when minifying using variables.
Since variables are just plain string replacements, any character or combination of characters can be used. This also means non-printable characters and characters like spaces and tabs. So of course that's what I did.
In the end I had 554 variables. This means I needed variables with 2 byte identifiers, so while generating them, I made it sort the replacements based on how many bytes could be saved when putting the value in a variable. The ones that could save the most would receive a one byte identifier and the rest would get a two byte identifier.
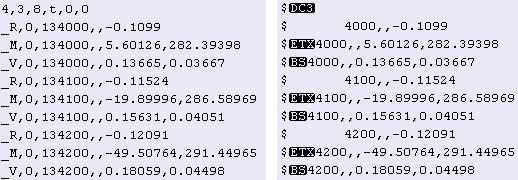
Left: normal, right: with variables.
The black boxes displayed in the picture above are non-printable characters as displayed by notepad++. The whitespace is in fact a tab character. It naturally shows as an indent size of 8 characters in text editors, but of course it's only 1 byte in size. The size difference between left and right is 54 bytes. It may not sound as much, but this example is 10 lines while the finished storyboard is almost 1M lines.
Stable vs Lazer #
As mentioned before, only sequential nesting is possible when using variables
in stable. However, in Lazer, proper nesting seems to be supported. In lazer,
a line is processed as long as it has a $ in it and if the line
after variable processing is different from the line before it was processed.
[256]
$time=2000,3000
$fade=_F,0,$time,0,1
$scale=_S,0,$time,2,5
[32]
4,3,1,b,0,0
$fade
$scale
Same as before, but since the $time comes first,
this will fail in stable but work in Lazer.
This also means it's easy to make Lazer go into an infinite loop and eventually run out of memory by making a variable reference itself.
[256]
$expandme=xxxxxxxxxxxxxxxxxxxxxxxxxxxxxxxxxxxxxxxxxxxxxxxx$expandme
[32]
$expandme
Prepare your RAM to be eaten.
Self destruction #
By combining the things we found out about variables, it's very easy to write some storyboard code that will be destroyed by osu! when saving the map using the in-game editor. Of course I decided to add this to my storyboard, because it's fun.
Corrupting the storyboard on save #
[256]
$a=200
$aa=400
[32]
4,3,1,b,400,400
Self corrupting variable configuration.
As mentioned before, osu! will try to insert variables when saving.
The 400 matches the value of the $aa variable.
Since it is preceded by a comma, the variable is inserted. The line is now
4,3,1,b,$aa,$aa. This would not be a problem if it wasn't for the
$a variable being there. Since variables are processed sequentially,
osu! will replace the line to 4,3,1,b,200a,200a and throw an error
when attempting to open the map again.
Deleting the storyboard file on save #
For object declarations that are sprites or animations, osu! will simply ignore the object and all its commands if the declarative line is incorrect. It won't even show an error, even if the commands contain garbage.
[32]
Sprite
 hey look it's a bad object declaration
 osu! will just skip all these lines
            .____________.
           ./\  ________ \.
          ./  \ \______/\ \.
         ./ /\ \ \  / /\ \ \.
        ./ / /\ \ \/ / /\ \ \.
       ./ / /__\_\/ / /__\_\ \.
      ./ /_/_______/ /________\.
      .\ \ \______ \ \______  /.
       .\ \ \  / /\ \ \  / / /.
        .\ \ \/ / /\ \ \/ / /.
         .\ \/ / /__\_\/ / /.
          .\  / /______\/ /.
           .\/___________/.
Who needs comments?
When the storyboard contains no object declarations at all, osu! for some reason just deletes the osb file. Since invalid objects are skipped, this means that the file will also be deleted if it only has invalid objects. This idea can be combined with the corrupting commands to make a working storyboard that will be deleted after saving it twice.
[256]
,,,=Foreground,
[32]
4,3,1,d,0,0
_M,0,1,1000,100,200,200,100
Storyboard that will corrupt and eventually be deleted.
When saving the first time, the object declaration will be changed to
Sprite,Foreground,Centre,d,0,0, because that's the way osu! saves that.
Then the variables will be processed, changing that line to
Sprite,,,,Centre,d,0,0, effectively making this object declaration invalid.
This will happen to every object, so the saved storyboard will only contain invalid
objects (except if there are objects that are not on the Foreground layer,
but more variables can be added to make everything corrupt). The result is that osu!
will just delete the osb file when it's being saved a second time because it doesn't
have any objects anymore since the invalid ones are skipped.
Diskfiller #
Of course we came up with some more ideas. Just making the storyboard invalid wasn't enough, we needed more. We found a way to make the storyboard file grow in size each time it's being saved.
[256]
,,=,,,,,,,,,,,,,,,,,,,,,,,,,,
,,,,,,,,,,,,,,,,,,,,,,,,,,=,,
[32]
4,3,1,d,0,0
The single event line is just there because osu! doesn't load storyboards without commands.
When opening this in the editor and saving, you'll notice that it changed slightly. Apparently every line in the variable section is also checked for variable replacement when saving the map.
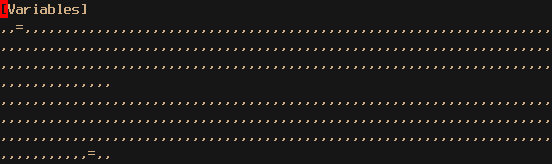
That's a bit more commas than there were earlier.
Re-open and save this two more times. Saving the beatmap three times made the file size grow from a humble 92 bytes to a whopping 165.785.012 bytes (165MB)! At this point osu! fails to even load the storyboard again.
It's also possible to start with less commas in the beginning, so it would take a little more save cycles to make it grow so big. It is hard to get it right though. The sample I showed above seemed to have the best outcome on my machine. I tried various amounts of commas at the start, but that almost always ended with a file that's 'only' a few hundred kilobytes in size and trying to save it once more just results in osu! running out of memory and erroring.
The fun thing is that this is not really noticable (other than the load and save times) since the whole storyboard keeps working like there's nothing wrong. It's only those two lines that are being expanded, which doesn't affect the other parts.
Staircase of death #
Filling the disk is cool and all, but not very reliable. It's possibly also very dependent on the user's machine. And it's more fun to completely annihilate the storyboard instead of just filling it >:D. So I came up with the following configuration (the commands under events are just some commands I copied from my storyboard to provide an example on what this does later).
[256]
$,=,
$,$,=1
$,$,$,=2
$,$,$,$,=3
$,$,$,$,$,=4
$,$,$,$,$,$,=5
$,$,$,$,$,$,$,=6
$,$,$,$,$,$,$,$,=7
$,$,$,$,$,$,$,$,$,=8
$,$,$,$,$,$,$,$,$,$,=9
$,$,$,$,$,$,$,$,$,$,$,=0
[32]
4,3,8,2,0,0
_R,0,15300,,2.97734
_M,0,15300,,273.4028,320.43344
_V,0,15300,,14.03057,0.5
_R,0,15350,,3.01256
_M,0,15350,,273.80444,321.19431
_V,0,15350,,14.08539,0.5
_R,0,15400,,3.0477
The staircase of death.
The $ can be replaced with anything, really,
but this is kind of what I ended up using.
Emily: we should call this the staircase of death
August 26, 2018
After saving the map in osu!, the commands as shown in the example will look quite a bit different.
Sprite,Foreground,BottomLeft,"2",$,$,$,$,$,$,$,$,$,$,$,,$,$,$,$,$,$,$,$,$,$,$,
 M,$,$,$,$,$,$,$,$,$,$,$,,$,$,$,$,$,$,$,$,300,$,$,$,$,$,$,$,$,$,$,$,$,3.4028,$,$,$,$,20.4334
 R,$,$,$,$,$,$,$,$,$,$,$,,$,$,$,$,$,$,$,$,300,$,$,$,$,.97734
 V,$,$,$,$,$,$,$,$,$,$,$,,$,$,$,$,$,$,$,$,300,$,$,$,$,$,$,$,$,.03057,$,$,$,$,$,$,$,$,$,$,$,.5
 M,$,$,$,$,$,$,$,$,$,$,$,,$,$,$,$,$,$,$,$,350,$,$,$,$,$,$,$,$,$,$,$,$,3.8044,$,$,$,$,21.1943
 R,$,$,$,$,$,$,$,$,$,$,$,,$,$,$,$,$,$,$,$,350,$,$,$,$,$,.01256
 V,$,$,$,$,$,$,$,$,$,$,$,,$,$,$,$,$,$,$,$,350,$,$,$,$,$,$,$,$,.08539,$,$,$,$,$,$,$,$,$,$,$,.5
 R,$,$,$,$,$,$,$,$,$,$,$,,$,$,$,$,$,$,$,$,400,$,$,$,$,$,.0477
Osu! won't like this.
Now imagine a million lines like that... Osu! did run out of memory when I tried to do it on the finished storyboard, so I reduced the staircase to only have the 3 first steps. It probably could've handled more, but I probably didn't feel like testing that since it takes 50 seconds to load the storyboard and another 45 seconds to save it. But even with only the first three steps, the file goes from 25MB to 41MB in size.
Another fun thing is that osu! shows a messagebox every time it couldn't parse a command. Since there are now almost a million lines that are invalid, osu! will throw a million messageboxes at your face when you try to re-open the map. The only effective way to get out of that is to just kill the osu! process.
Self destruction > Staircase of death
Upload failure #
When I was done and tried to upload my map, I encountered a problem. The first time I pressed upload, osu! just crashed. But that's not really the problem (seems like that was a one-off). When I tried to submit the second time, I got greeted by following error after some time of osu! being stuck.
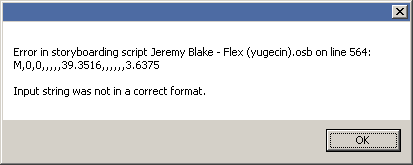
Uh-oh.
Murdered by my own creation. It seems like osu! saves and then reloads the beatmap before submitting, so it destroys the storyboard. We then thought about ways of uploading it without having to use the in-game submission. It's possible, but a bit sketchy and probably not a good idea. A few moments later I just thought "what happens if I set the file as read-only?". So I did just that. When attempting to upload again, it tried saving the beatmap again, but this time it showed a bubble error notification that osu! was unable to save the beatmap. Bingo. Luckily this didn't make the upload wizard upset, so now I could just upload the non-destroyed version, yey!
Take that, game!
Valid corruption #
While messing with the staircase of death method, I've also found a way to make the commands corrupt but still be valid. The result is ... pretty much what you imagine when thinking about corruption. See it for yourself: YouTube: storyboard corruption.
[256]
$=0
$$=1
Variables for great corruption.
This is achieved with just two variables. Note that you can give the variable any
name you want, the only requirement here is that the second variable's name should
be the first variable's name twice. What this does is basically changing every
1 in the beginning of a number to 00. For example:
on saving, _V,0,50,,1.21683,0.5 will become
_V,$,50,,$$.21683,$.5. When loading again, it gets replaced to
_V,0,50,,00.21683,0.5. The x scale is now changed from
1.21683 to 0.21683.
This happens to every value, including times and colors etc.
Related work #
Dualive by Max #
When I was almost finished with my storyboard, I found out about the dualive beatmap. Its storyboard features a 3d wireframe tetrahedron and spectrum. (Epilepsy warning) YouTube: Quarks - Dualive (Cinema).
Flower Trip by Max #
I also found another one, made by the same creator, Max. In his Flower Trip blogpost he links to this video of a 3d wireframe spectrum: YouTube: Spectrum (sorry Max for linking to your unlisted video but I can't seem to find a full video of the whole map with storyboard).
Related work (continuation)
So those had 3d wireframe objects, back in 2016. I kind of wish I saw them earlier, so I would know that decimals in move commands are allowed and not ditch this project for months. Still, stupid from my end that I didn't try enough to actually see if it was possible.
I'm not really involved in the osu! community so I don't know if there's more of these...
world.execute(me) by Exile- #
There's also of course the world.execute(me); storyboard by Exile-. Someone in the comments of my video asked if my storyboard could have a higher framerate. I replied that it would increase the size of the file greatly, to which someone mentioned the world.execute(me); storyboard. I replied the following:
robin_be: the 3D objects in world.execute are in one position and have a constant rotation which are cleverly being done by only a few commands in a loop, which are eased from beginning to end, making the result very fluid (it basically has as much fps as osu is running on afaik). But the rotations here are not constant at all, not to mention that the camera is not in a static position, so it's pretty much impossible to do it as smooth. (Do note that some parts that are only made of dots: the tunnel, cube, waves, torus, stars, text, .. are eased and fluent, but that's just not possible with the opaque objects).
Living Flower: but still world.execute eats pretty much my whole pc when I'm trying to run it on on storyboard mode
robin_be: Same here. I just checked and the last 3d scene in world.execute (the heart with wings) is made using 10389 moving sprites and I guess that takes its toll. For comparison, my heart is made of 384 sprites (and less than half of those are shown simultaneously, because most are facing backwards) and the 3D text scene is made of 1036 sprites (maybe 500-ish or less shown simultaneously). Using that metric, my most demanding scene is the greetings part, because all the text is made using 3934 2x2 sprites.
Epilogue #
So... this whole project (and blogpost) took a fair amount of my time, while I also wanted to work on different projects. But since this one is finite (ie it stops when it's finished), I felt like I couldn't really work on other long-running projects as long as this wasn't finished...
It was fun to do and I'm quite content with the result. There are only a few things in my mind, like in retrospect it would've been cooler if it was a bit longer, I liked the pixelscreen used for the heart but I wanted to see more of it because it's such a nice effect in my opinion, I could've made some more complex 3d scenes... Maybe next time though ;)
I managed to make this post so damn long but I have no idea what to write here. Welp, thanks for reading this.
Fun stuff #
Since C#'s float.Parse also accepts NaN and the inifinity
symbol, we also added that in the last line of the storyboard, just for the lols :)
4,3,1,,NaN,-∞
Won't be visible, but fun to have.
Emily also found out that if you put NaN as value in the osu file for
DistanceSpacing in the Editor section, osu! just freezes
and crashes when you press ALT in the editor on the compose tab.
So of course I added that as well :) This reportedly seems to make this beatmap
unimportable in lazer though, but I don't really care about lazer. It doesn't feel
like osu! and it doesn't even run on my computer, it just crashes.
Storyboard load #
The max storyboard load I've seen in my map is 6.95x for a split second just when the 3d text part starts but in the other parts it stays far below 0.25x (except in the last part of the tunnel scene where it zooms out). The SB load metric is flawed anyways, but it's still interesting to see. Especially because I've seen some other storyboards that go as far as 18.72x. I'm not complaining of course, just using a background makes it go to 1x, but 18x is a bit high (and that map is ranked).
Epilogue (continuation)
robin_be: also, turns out writing a blogpost takes a long while <.<
September 3, 2018
Oh god Firefox' reader view estimates this at 84-107 minutes... I didn't mean for this to be so long :/ Pretty accurate though, I think I spent almost that long proofreading this...
If you want to comment publicly or something I guess you can reply to my tweet about this post.